We’re introducing the new query creation feature that organizes your ad accounts and allows you to group them by clients and accounts, providing agencies with a more efficient and streamlined approach to managing their accounts. This new query interface consists of two segments. The first segment enables the selection of accounts on a data source level (e.g., Facebook, Google, and LinkedIn ad accounts), while the second segment is focused on the client level.
This feature is specifically designed to help agencies manage the complexity of managing numerous client accounts. By grouping accounts at data source and client levels, agencies can better organize their workflow, improve reporting efficiency, and gain a holistic view of performance across channels. The result? More time to focus on optimizing campaigns, delivering more profound insights, and scaling operations with ease.
This article is all about running queries using Accounts. For help creating queries based on Clients, read here.
Account Selection
The new interface helps you organize accounts based on data sources. In the previous version, you could select multiple ad accounts from the same platform, such as Facebook or Google, to run queries. The new version lets you choose multiple accounts from different platforms, such as Google, Facebook, LinkedIn Ads, and others, enabling cross-channel insights across multiple ad accounts.
Here’s a step-by-step guide to make the process easier for you:
Once you select the Data Queries option from the main menu, you will land in the query creation window. Now, click “Add +” on the top left of the sidebar to enter the query creation section.
Step 1: Click on the text next to “Name” and create a name for the query.
Proceed by selecting Accounts options. This option is handy when operating a single brand or obtaining data for multiple or single ad accounts from a particular data source.
Step 2: Select the “Accounts” dropdown to view the list of accounts. Once you click on an account, you will see a list of ad accounts and a Search bar.
Step 3: Use the search bar to find the ad account you need. Once you’ve done so, click the dropdown icon to view and select the ad account.
Step 4: Once the ad account is selected, you can see the number of selected accounts and the icon of the selected data sources.
Following these steps allows you to select the ad account and create your query.
Awesome! You have now mastered selecting the ad account for your query. You can go ahead and run your query to retrieve the data.
Next, add the metrics and dimensions you want to analyze. You can choose from 100+ metrics and dimensions to assess your campaign’s performance. To do so, add the metrics, dimensions, and date range based on your campaign requirements or the data you’d like to analyze.


Now, you have to configure your data reporting by choosing how to customize it.
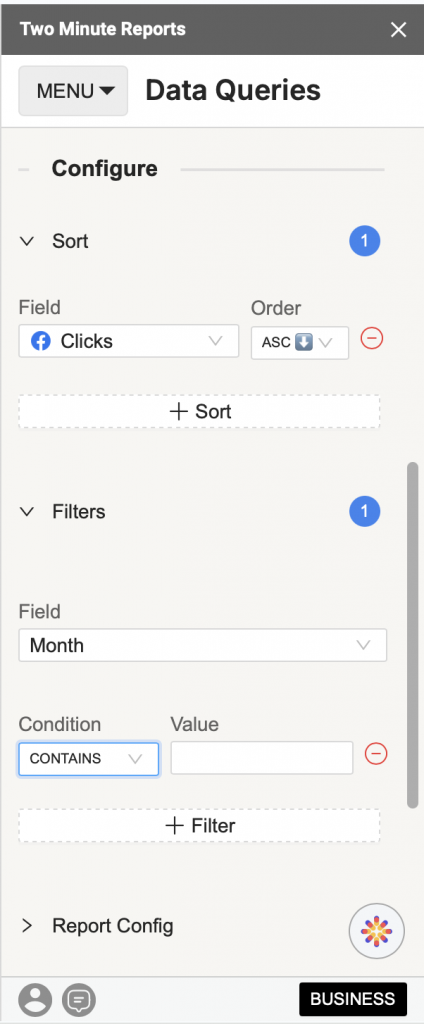
It would be best to customize your data reporting by selecting the relevant fields and choosing whether to sort them in ascending or descending order. You can also apply custom filters to display only the necessary information.

Other data options, such as currency conversion, are also available. If you need further assistance, please get in touch with our support team.
Bonus: Here is a list of connectors that can be combined with different accounts of the same data source type (e.g., a Facebook Ads account with another Facebook Ads account) or with accounts from other data sources (e.g., a Facebook Ads account with a Google Ads account).
- Amazon Ads
- Apple Search Ads
- Facebook Ads
- Facebook Insights
- Google Analytics
- Google Analytics 4
- Google Ads
- Google My Business
- HubSpot
- Instagram Insights
- Klaviyo
- LinkedIn Ads
- LinkedIn Pages
- Microsoft Ads
- Pinterest Ads
- Shopify Ads
- Snapchat Ads
- TikTok Ads
- WooCommerce
- YouTube Analytics
This list of connectors cannot be blended with different accounts of the same or different data source types.
- Amazon Seller
- API Bridge
- App Store
- Cloud Firestore
- ChatGpt
- Claude
- Google Search Console
- Google Trends
- Maria DB
- My SQL
- Page Speed Insights
- PostgreSQL